
How to Prepare Your Backyard for a Custom Storage Shed Installation
Knowing how to prepare your backyard for a custom storage shed installation is the single biggest factor separating a smooth delivery day from a costly delay. Most schedule setbacks come down to site issues that the homeowner could have resolved in an afternoon. Here is exactly what to do before the crew arrives.
What this guide covers:
- Permit and HOA requirements you need to confirm first
- How to locate underground utilities before any digging
- Foundation types and which one fits your site
- Grading and leveling your spot correctly
- Delivery access requirements (gate width, slope, overhead clearance)
- Drainage planning to protect your shed long-term
- What Wright’s Shed Co. handles on installation day
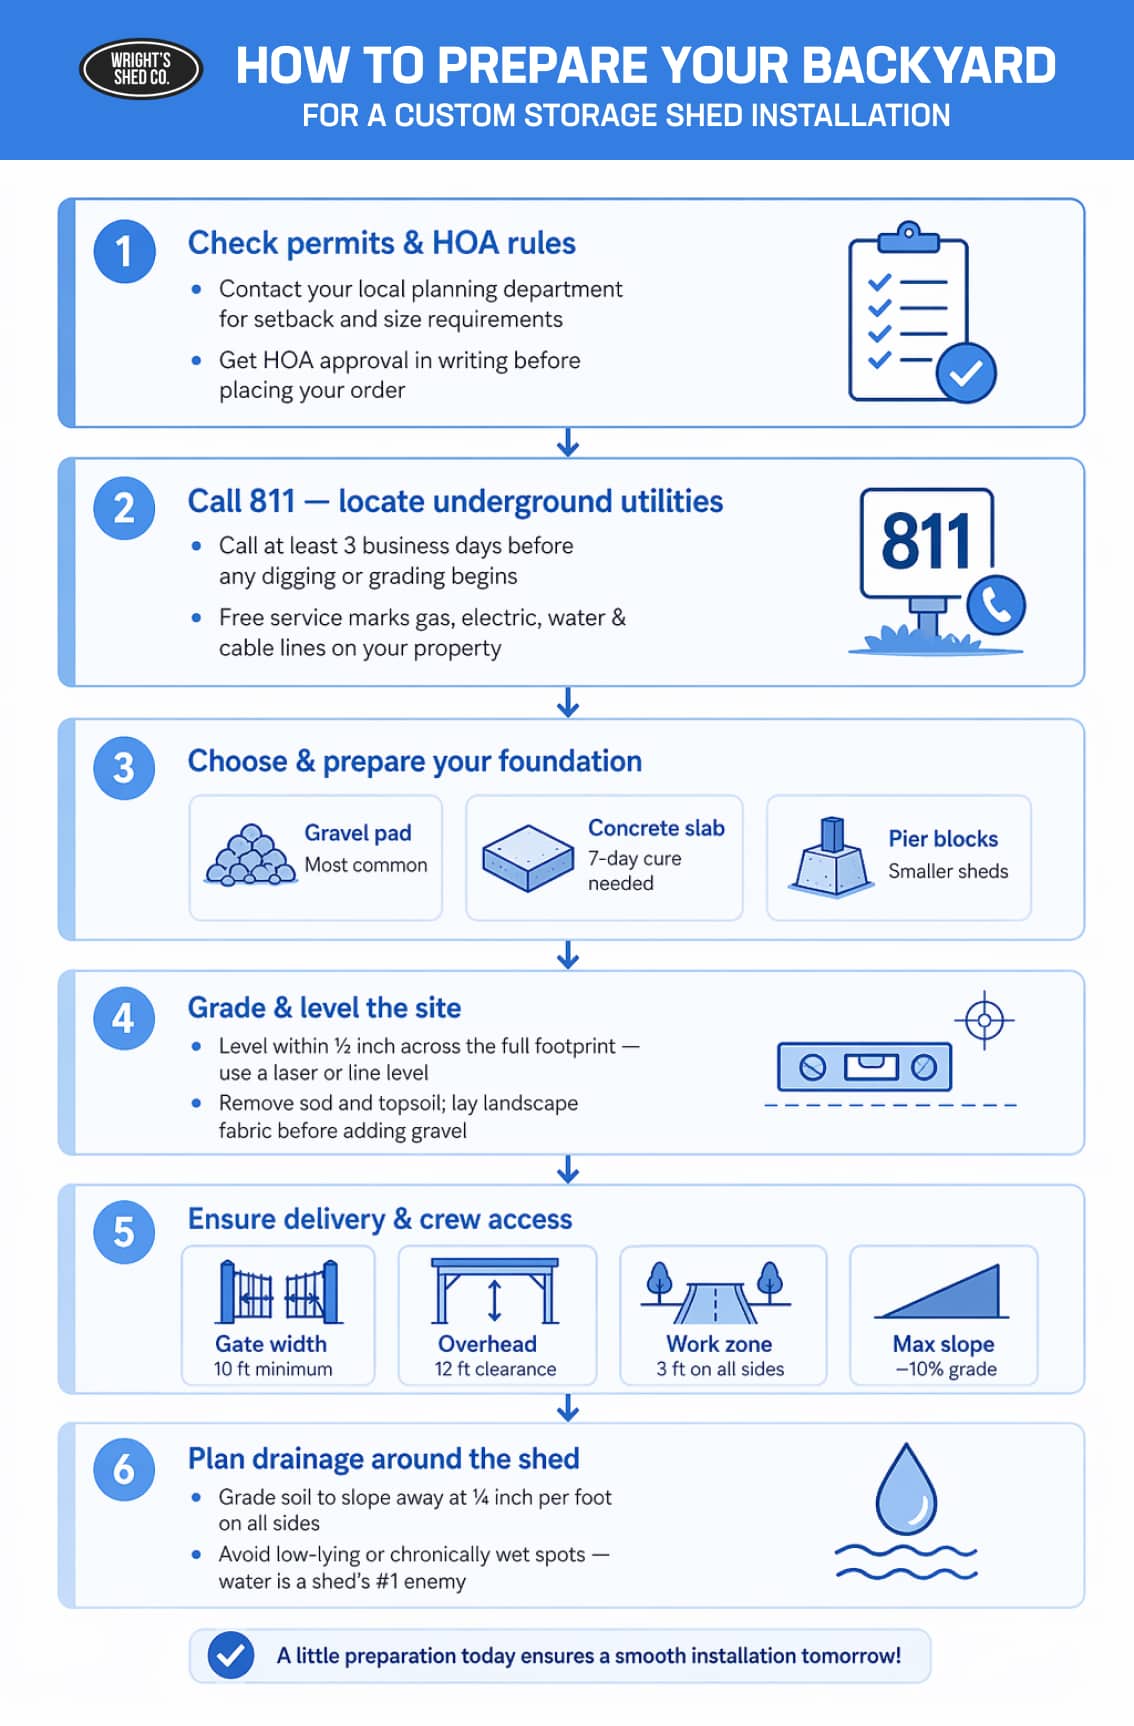
Step 1: Check Local Permits and HOA Rules
Permit requirements vary by county and municipality. In Utah, Idaho, Nebraska, and Iowa—the states where Wright’s Shed Co. builds—rules differ not just by state but by city and subdivision. A structure that needs no permit in one county may require a full building permit in the next town over.
Call your local planning department or visit their website before you finalize your shed location. Ask specifically about:
- Setback requirements — the minimum distance from property lines, fences, and your home’s foundation
- Maximum square footage without a permit
- Height restrictions for accessory structures
- Foundation type requirements, if any
If you live in an HOA, the rules can be even more specific. Some associations dictate siding color, roofline style, and exactly how many feet of clearance you need from neighboring fences. Getting a letter of approval from your HOA before ordering saves you from having to relocate a fully built shed.
Pro Tip: Call your HOA management company directly and ask for their accessory structure policy in writing. Email approval creates a paper trail that protects you if there is ever a dispute about placement.
Already working through the buying process? Use the custom storage shed buying checklist to make sure you have every decision covered before you order.
Step 2: Locate Underground Utilities (Call 811)
Before you do any digging, grading, or foundation work, call 811. This is the federally designated “Call Before You Dig” number in the United States. It connects you to your state’s one-call center, which dispatches utility companies to mark underground gas, electric, water, and cable lines on your property — at no cost to you.
811.com recommends calling at least three business days before any digging begins. In Utah, the service is managed by Blue Stakes of Utah. In Nebraska, it goes through the Nebraska One-Call System.
Even shallow grading, removing a few inches of topsoil to level a site, can nick an irrigation line or fiber cable if you skip this step. Utility strikes are expensive, sometimes dangerous, and entirely preventable.
Pro Tip: After utilities are marked, photograph the flags with your phone before any soil work begins. If the stakes get disturbed during prep, you will have a reference to recheck clearances.
Step 3: Choose and Prepare Your Foundation
Foundation choice has a bigger impact on your shed’s lifespan than almost anything else. The right option depends on your soil type, slope, drainage patterns, and whether you want a permanent or relocatable structure.
The three most common options:
Gravel Pad: A compacted bed of 3/4-inch crushed stone, typically 4–6 inches deep, is the most popular choice for residential sheds. Gravel drains well, levels reasonably fast, and does not require curing time. Extend the pad at least 6 inches beyond the shed footprint on all sides.
Concrete Slab: A poured concrete slab offers maximum stability and works well for larger builds or insulated custom storage sheds where a tight, level floor matters most. Concrete needs at least seven days to cure before you can set a shed on it. Plan accordingly when scheduling your installation date.
Concrete Deck Blocks or Pier Footings: Individual blocks or poured piers set at corners and mid-spans work well for smaller sheds on relatively level ground. This option is faster to install than a full slab and still provides solid bearing points.
For a deeper look at the tradeoffs, read Wright’s full guide on what type of foundation is best for a shed.
Step 4: Grade and Level the Site
An unlevel site causes more long-term shed problems than almost any other factor. Even a two-inch difference across the footprint puts lateral stress on the wall framing, causes doors to rack and stick, and accelerates floor deterioration.
Your target: the pad must be level within 1/2 inch across its entire surface. Here is how to get there:
- Strip the sod and topsoil. Organic material compresses and shifts. Remove it entirely within the shed footprint plus a 12-inch border.
- Establish a reference grade. Drive stakes at each corner, run string lines, and use a line level or laser level to find the high point of your site. That high point sets your finished pad height.
- Cut or fill to grade. On the high side, remove soil until you hit mineral subsoil. On the low side, bring in compactable fill — not topsoil — and compact it in 4-inch lifts using a plate compactor.
- Lay landscape fabric before gravel. This separates the aggregate from the subsoil and suppresses weeds that would otherwise push up through the pad over time.
- Spread and compact gravel. Rake to a consistent depth and run the plate compactor over the surface again.

A properly prepped, level site like this one makes installation faster and ensures the shed sits correctly from day one.
Step 5: Ensure Delivery Access
Wright’s Shed Co. builds sheds on-site. That means the crew arrives with lumber, tools, and materials — not a fully assembled box that needs a crane. However, the site still needs to be accessible for a truck and trailer carrying those materials.
Check these access points before your installation date:
- Gate width: A standard single gate is 36 inches, which is too narrow. Most delivery vehicles need at least 10 feet of clearance. If your fence gate is narrower, plan to temporarily remove a panel or direct the crew to an alternate access route.
- Overhead clearance: Low-hanging tree branches and roof eaves can block material movement. Trim anything below 12 feet along the delivery path.
- Slope: A steep yard grade makes moving heavy lumber and sheet goods difficult. If the path from the street to the build site exceeds roughly a 10% slope, let the Wright’s Shed team know when scheduling — they can plan accordingly.
- Ground conditions: Soft, wet soil can cause a loaded trailer to sink. If your yard stays soggy, consider laying plywood sheets along the travel path to distribute the load.
- Clearance around the build site: Plan for at least 3 feet of working space on all four sides of the footprint. The crew needs room to stand ladders, swing roofing panels, and maneuver trim pieces.
Step 6: Plan for Drainage Around the Shed
Water is the primary cause of premature shed failure. Rot starts at the floor, works up through the wall framing, and is often invisible until it has caused significant structural damage. Good drainage planning costs almost nothing and adds years to your shed’s service life.
The fundamental rule: water should always flow away from the shed, not toward it.
Positive grade away from the structure. The finished grade around your shed should slope at least 1/4 inch per foot away from the foundation on all sides. If your yard naturally drains toward your chosen site, you may need to build up the pad or install a French drain upslope.
Extend your downspouts. If your shed’s roofline sits close to the house, ensure gutters and downspouts are routing water well away from the shed’s footprint. Roof runoff concentrated in one spot creates erosion and saturates the soil directly under the floor runners.
Avoid low spots. If a corner of your yard collects standing water after rain, that is the wrong place for a shed. Even a foundation elevated on gravel or piers cannot fully compensate for a chronically wet site. Choose a naturally well-drained location whenever possible.
For insulated custom storage sheds in particular, drainage matters even more because moisture infiltration degrades insulation performance and can cause condensation issues inside the structure.
How Wright’s Shed Co. Makes Your Custom Storage Shed Installation Straightforward
When you order a custom storage shed from Wright’s Shed Co., you are not buying a flatpack kit and hoping for the best. The crew shows up and builds the shed on your property from the ground up, using LP SmartSide siding, 2×4 framing at 16 inches on center, 3/4-inch tongue-and-groove OSB flooring, and steel-framed doors as standard.
Here is what the installation process looks like when the site is properly prepared:
- Arrival and layout: The crew reviews the foundation, confirms the level, and sets the floor runners. Pressure-treated skids provide the base unless you have requested a slab-mounted build.
- Framing and walls: Walls go up in sections. The double top plates are standard on every build, not an upgrade.
- Roof and sheathing: Trusses are joined with steel plates, 7/16-inch OSB goes down as sheathing, and limited lifetime architectural shingles finish the roof.
- Doors, trim, and finishing: Steel-framed doors with decorative black hinges and a keyed latch entry are included. The crew installs 4-inch Miratec trim and does a final walkthrough with you before leaving.
Wright’s Shed Co. has been building in Utah since 1997 and has expanded to serve Idaho, Nebraska, and Iowa. Every shed comes with manufacturer warranties up to 50 years on materials, and the company personally warrants the Orchard, Lean-To, and Farm-style builds for up to 8 years.
The difference between a four-hour installation and an all-day ordeal almost always comes down to the site. When the foundation is level, access is clear, and drainage is addressed, the crew can work efficiently and you get your shed on schedule.
See the full range of custom builds at the Wright’s Shed Co. gallery, or explore detached garage options if you need a larger structure.

Frequently Asked Questions about How to Prepare Your Backyard for a Custom Storage Shed Installation
How far from a fence does a shed need to be?
Most municipalities require 5 to 10 feet of setback from property lines and fences, but requirements vary. Check with your local planning department before you choose your spot.
Do I need a permit for a storage shed in Utah?
Permit thresholds vary by city and county in Utah. Many jurisdictions exempt sheds under 200 square feet, but some require permits for any accessory structure. Always verify with your local building department.
What is the best foundation for a shed in a backyard?
A compacted gravel pad is the most practical choice for most residential backyard sheds. It drains well, installs quickly, and works with most soil types. Concrete slabs offer more rigidity but require curing time.
How level does the ground need to be for a shed?
The finished pad should be level within 1/2 inch across the entire footprint. Greater variation causes door and wall problems over time and may void manufacturer warranties on the structure.
What is the 811 dig-safe number for?
811 is the national “Call Before You Dig” number. Calling connects you to your state’s utility notification center, which marks underground lines so you avoid hitting them during site prep.
How to Prepare Your Backyard for a Custom Storage Shed Installation: Final Checklist
How to prepare your backyard for a custom storage shed installation comes down to six decisions made in the right order: permits, utilities, foundation type, grading, access, and drainage. Get these right, and installation day runs cleanly. Skip one, and you risk delays, extra costs, or a structural problem that shows up years later.
Wright’s Shed Co. handles everything from wall framing to the final trim detail. Your job is to hand them a site that is ready. Use this guide as your pre-installation checklist, and you will be in good shape.