Accessibility Made Simple: The Essential Shed Entry Ramp Guide
A shed entry ramp provides safe, convenient access for lawn equipment, wheelbarrows, and mobility devices into your storage shed. Here’s what you need to know:
- Recommended Slope: 1:12 ratio for wheelchairs (ADA), 3:12 ratio for lawn mowers
- Materials: Pressure-treated wood, concrete, or aluminum
- Average Cost: $100-450 depending on materials and size
- DIY Time: 4-8 hours for a basic wooden ramp
- Weight Capacity: 500-900 lbs for standard ramps
Building a shed entry ramp might seem like a minor upgrade, but it’s one of those practical additions that makes a world of difference in your daily routine. Instead of struggling to lift heavy equipment over that 8-12 inch threshold, a properly built ramp creates a smooth transition that saves your back and prevents damage to expensive tools and machinery.
I’ve seen too many homeowners improvise with flimsy boards that create safety hazards and actually damage shed floors over time. A proper ramp isn’t just convenient—it’s essential for protecting both your investment and your health.
Whether you’re looking to safely roll your riding mower into storage, create wheelchair accessibility, or simply make it easier to move garden tools, this guide will walk you through the process of building a durable, functional ramp that matches your specific needs.
Why a Shed Ramp Matters
That gap between the ground and your shed floor might not seem like much—typically 8-14 inches—but it can become a daily frustration without a proper shed entry ramp. Think about wrestling your lawn mower up that lip every weekend, or the strain on your back when hauling in heavy garden supplies.
As one of our veteran contractors at Wright’s Shed Co. often says, “I’ve built over 1,400 sheds using pressure-treated 4×4 spikes and deck boards with no ramp failures. But what’s interesting is that customers who skip the ramp initially almost always come back requesting one later.”
This isn’t surprising. Once you experience the convenience of rolling equipment in and out instead of lifting it, there’s no going back.
Everyday Benefits for Homeowners
Your weekend yard work becomes significantly easier with a shed entry ramp in place. That heavy zero-turn mower? Simply drive it up the ramp rather than recruiting the neighbors for help. Your garden tools, wheelbarrow, and snow blower all become more accessible without the awkward lifting and potential for damage.
One of our customers in Nebraska shared his experience: “After my knee surgery, I realized I couldn’t lift my equipment into the shed anymore. The ramp you installed has been a game-changer—I can still maintain my yard independently.”
This accessibility benefit extends beyond just convenience. For homeowners with mobility challenges or those planning to age in place, a proper ramp transforms an inaccessible shed into a fully usable space. The Americans with Disabilities Act (ADA) recommends a 1:12 slope ratio for wheelchair access, while equipment like lawn mowers can handle steeper slopes up to 3:12.
The shed entry ramp also protects your investment in both equipment and the shed itself. No more scratched doorframes from dragging tools or damaged mower decks from bumping over thresholds.
Risk Reduction & Code Basics
Safety isn’t just a nice bonus—it’s a primary reason to install a proper shed entry ramp. Without one, your shed entrance becomes a trip hazard and an injury waiting to happen. A well-built ramp:
- Prevents back strain from heavy lifting
- Reduces slip and fall risks (especially important in wet or icy conditions)
- Decreases liability if others use your shed
- Protects expensive equipment from damage
Before grabbing your hammer, take a moment to check your local building codes. While most residential shed ramps don’t require permits, some municipalities have specific requirements about slope, width, and placement. This is particularly important if you’re in a neighborhood with an HOA or if your property has unique drainage considerations.
In areas with significant precipitation, like many parts of Utah and Idaho where Wright’s Shed Co. operates, proper drainage planning around your ramp prevents water from pooling and potentially damaging your shed foundation.
Designing Your Shed Entry Ramp
Proper design is crucial for a functional, safe shed entry ramp. Let’s break down the key considerations:
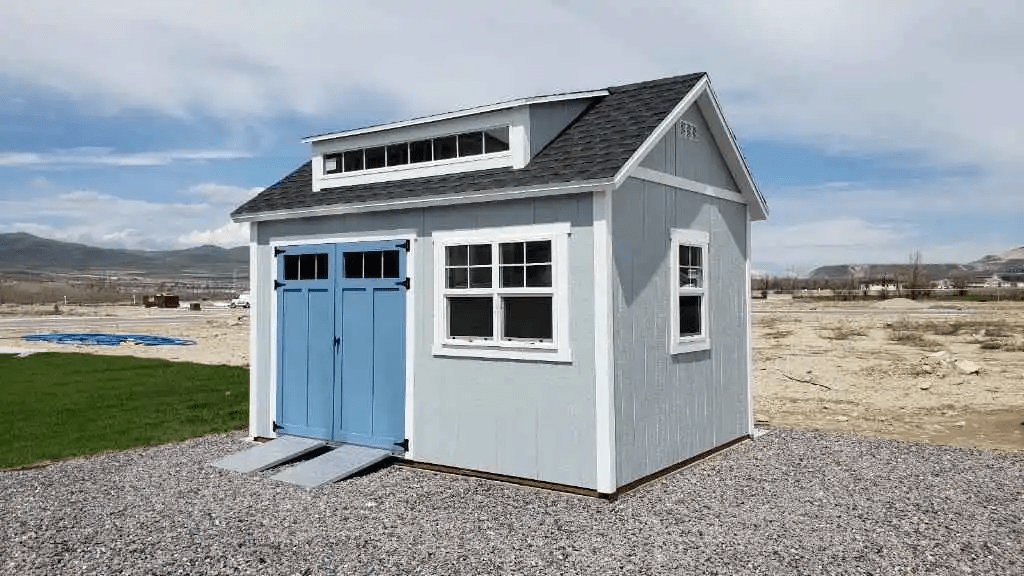
Measuring Rise & Run Correctly
Think of rise and run as the building blocks of your ramp’s DNA. Getting this relationship right determines whether your ramp will be a daily convenience or a daily hazard.
Start by grabbing your tape measure and level to find the vertical rise – that’s the height from the ground to your shed floor. This measurement is your starting point for everything that follows.
Next comes choosing the right slope. I’ve found that many first-time builders make the mistake of creating ramps that are too steep. As one of our experienced Wright’s Shed Co. builders often says, “Make the slope as shallow as possible to avoid safety and access problems down the road.”
Your ideal slope depends on what you’ll be rolling up that ramp:
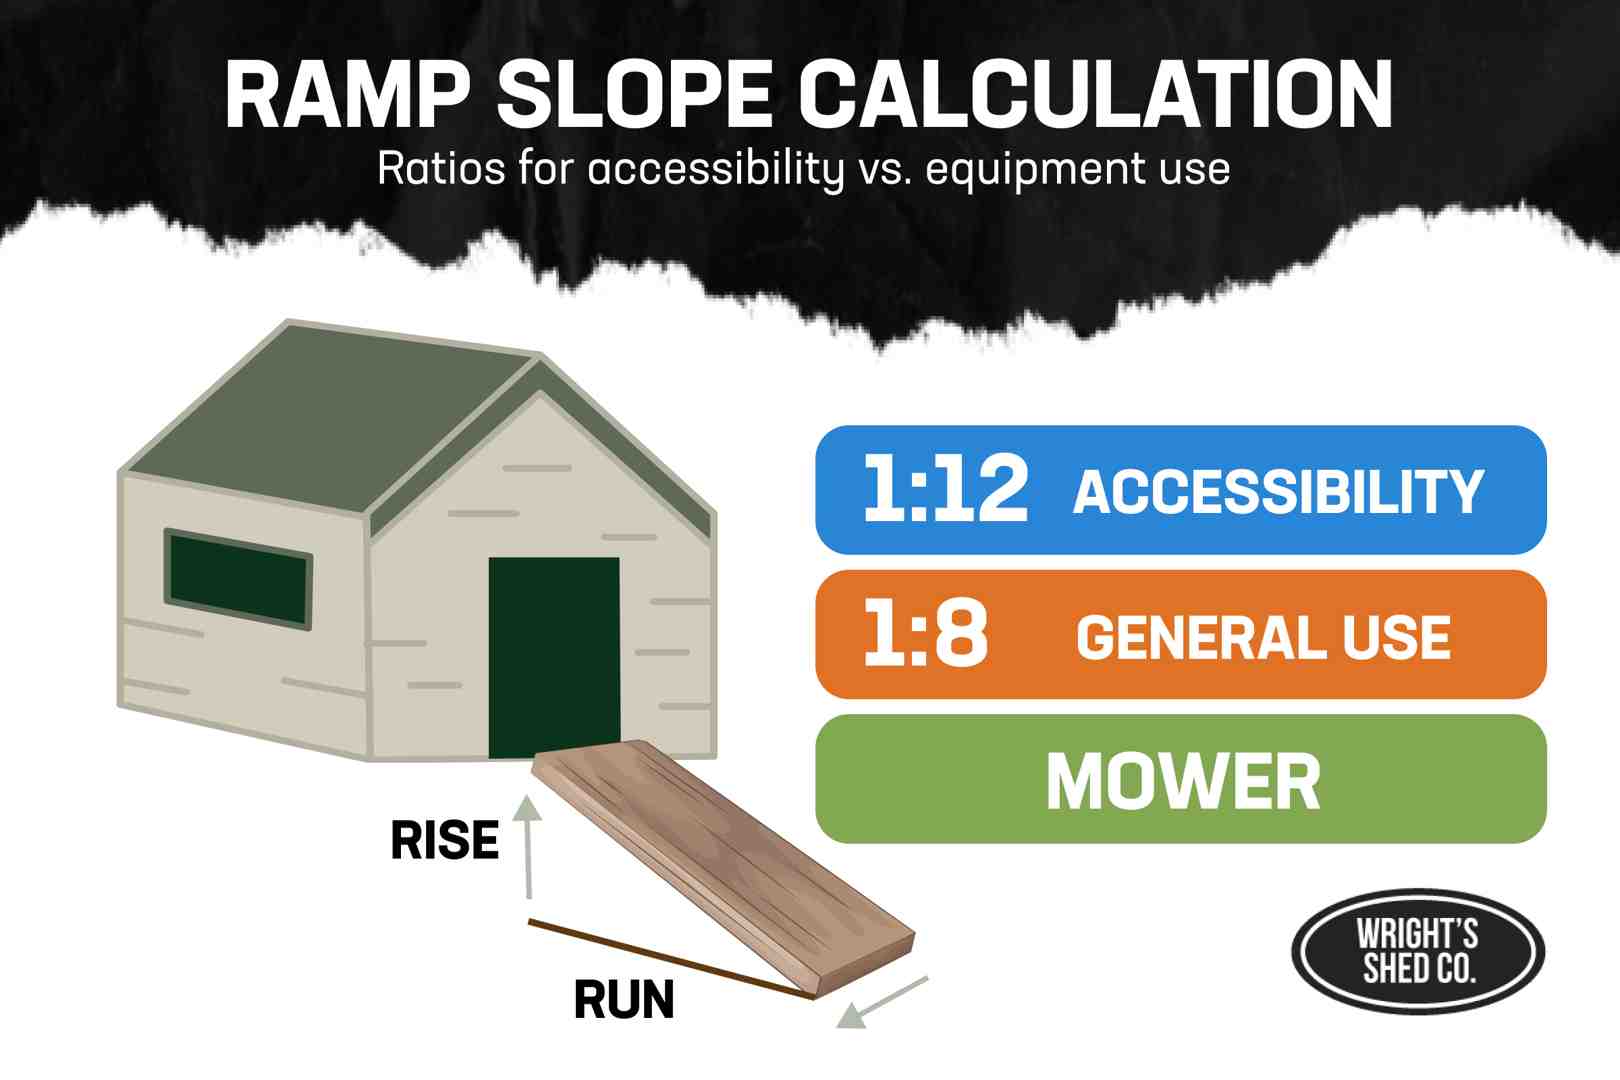
For wheelchair access, stick with a 1:12 ratio (one inch of rise for every foot of run). This gentle slope meets ADA requirements and makes accessibility a breeze.
For general use with garden carts and hand trucks, a 1:8 ratio gives you a good balance between space efficiency and usability.
If you’re primarily concerned with getting your lawn mower in and out, you can go up to a 3:12 ratio, but I wouldn’t recommend anything steeper. Your equipment (and your back) will thank you.
For precise measurements, a laser level can be incredibly helpful, especially for longer ramps. You can find more detailed slope guidance at Ask the Builder.
Calculating Shed Entry Ramp Length
Once you’ve measured your rise and chosen your slope ratio, calculating the ramp length becomes straightforward. Simply multiply your rise by your ratio.
For example, if your shed entry ramp needs to overcome a 10-inch rise:
- With a wheelchair-friendly 1:12 ratio: 10″ × 12 = 120″ (that’s 10 feet)
- With a mower-friendly 3:12 ratio: 10″ × 4 = 40″ (about 3.3 feet)
Don’t forget to account for equipment clearance. I once built a ramp for a customer with a garden tractor, and we had to adjust our design when we realized the front blade would scrape the ramp before the wheels even reached it. As one forum contributor wisely noted: “If using a snow plow, the blade may hit the ramp before the wheels if the slope is too steep.”
A slope calculator can take the math work out of this process, especially if you’re dealing with unusual measurements or space constraints.
Setting Width, Kerbs & Landing Zone
Width matters more than you might think for your shed entry ramp. I’ve seen too many DIYers build ramps exactly as wide as their door opening, only to struggle when trying to steer equipment through that narrow channel.
As a rule of thumb, make your ramp at least as wide as your shed door opening, but ideally, add an extra 6 inches on each side. This extra space accommodates the kerbs (those raised edges) that keep wheels from slipping off the sides.
Speaking of kerbs, don’t skip them! A simple 2×4 or 2×6 board running along each edge creates an adequate safety barrier that can prevent accidents. For wheelchair users or those with mobility challenges, these side rails are absolutely essential.
Don’t forget to plan for a proper landing zone at the bottom of your ramp. This flat area (at least 36 inches long) gives you a place to pause before ascending and makes the transition much smoother. If space allows, consider a fan-out landing that widens at the bottom for easier approach angles.
The door threshold also deserves attention—make sure your ramp meets it smoothly without creating a bump or gap that could catch wheels or become a trip hazard.
By taking the time to properly design your shed entry ramp with these considerations in mind, you’ll create a safe, functional addition that improves your shed’s usability for years to come. At Wright’s Shed Co., we’ve seen how a well-designed ramp transforms a simple storage shed into a truly accessible space for the whole family.
Choosing Materials & Tools
Selecting the right materials for your shed entry ramp is a bit like choosing the right foundation for your home—it determines everything from how long it’ll last to how much maintenance you’ll be doing on weekends.
Wood, Concrete, or Aluminum—Pros & Cons
When I’m advising homeowners on shed entry ramp materials, I always start by asking how they’ll use it and how long they want it to last.
Wooden ramps are the most popular choice for good reason. They’re budget-friendly at about $100-150, and most weekend warriors can build one with basic DIY skills. The flexibility to customize dimensions is fantastic, but there’s a trade-off—wood requires regular maintenance. Without proper treatment, you’re looking at replacing it every 4-5 years, and wooden surfaces can get slippery when wet. That said, a properly built wooden ramp can easily support 500-700 pounds, perfect for most residential needs.
Concrete offers best durability if you’re thinking long-term. A well-constructed concrete ramp can last 20+ years with virtually no maintenance, and the natural texture provides excellent traction in all weather conditions. The downsides? It’s permanent (so get the design right the first time!), requires more skill to install, and costs more upfront ($200-300+). The payoff is tremendous load capacity—easily handling 1,000+ pounds—making it ideal if you’re storing heavy equipment.
Aluminum ramps have become increasingly popular for their clean look and portability. They’re lightweight, completely rust-proof, and installation is typically quick. The main drawback is cost ($300-450), and you have fewer customization options. Many aluminum ramps support up to 900 pounds per plank, making them suitable for most residential uses.
I still chuckle when I remember a customer who told me: “I initially built with scrap plywood to save money, but after replacing it twice in three years, I upgraded to pressure-treated deck boards. I should have done that from the start.” Classic case of “buy nice or buy twice”!
Must-Have Tools & Hardware
Building a wooden shed entry ramp doesn’t require specialized equipment, but having the right tools makes all the difference between a weekend project and a month-long headache.
For tools, you’ll need the basics: a circular saw or miter saw for cutting lumber, a drill/driver with appropriate bits, tape measure, level, and framing square to ensure everything lines up properly. If you’re setting posts in the ground, a post hole digger will save your back. And don’t forget safety gear—I’ve learned the hard way that eye protection and gloves are non-negotiable!
Material selection is crucial for longevity. Start with pressure-treated lumber rated for ground contact (look for UC4A, UC4B, or UC4C ratings). Regular pressure-treated wood will rot when touching soil, but ground-contact rated lumber contains additional preservatives. All your fasteners should be galvanized or stainless steel to prevent rust, and joist hangers provide critical structural support where the ramp meets the shed.
For the foundation, concrete blocks or crushed stone creates drainage and helps prevent rot. Finally, don’t skip the anti-slip surface treatment—whether it’s grip tape, chicken wire, or specialized paint, this small addition prevents accidents in wet or icy conditions.
If you’re going the concrete route, you’ll need additional formwork materials and concrete mixing tools. For aluminum ramps, the tool list simplifies dramatically—typically just a drill and the appropriate fasteners included with your kit.
Investing in quality materials upfront might cost more initially, but it dramatically reduces maintenance headaches down the road. As we often tell customers at Wright’s Shed Co., the right materials mean your shed entry ramp will be something you use daily, not something you rebuild annually!
DIY Construction Steps & Safety Tips
Building your own shed entry ramp is a satisfying weekend project that pays dividends in convenience. I’ve guided dozens of homeowners through this process, and with the right approach, you’ll have a sturdy, functional ramp in no time.
1. Prep Ground & Base
The foundation of your ramp determines its longevity, so don’t rush this crucial first step:
Start by marking your ramp’s footprint with stakes and string to visualize the finished project. Next, remove any sod and topsoil to create a level working area. This might take some sweat equity, but it’s worth the effort!
Add at least 4 inches of crushed stone or gravel and compact it thoroughly. This drainage layer prevents water from pooling under your ramp.
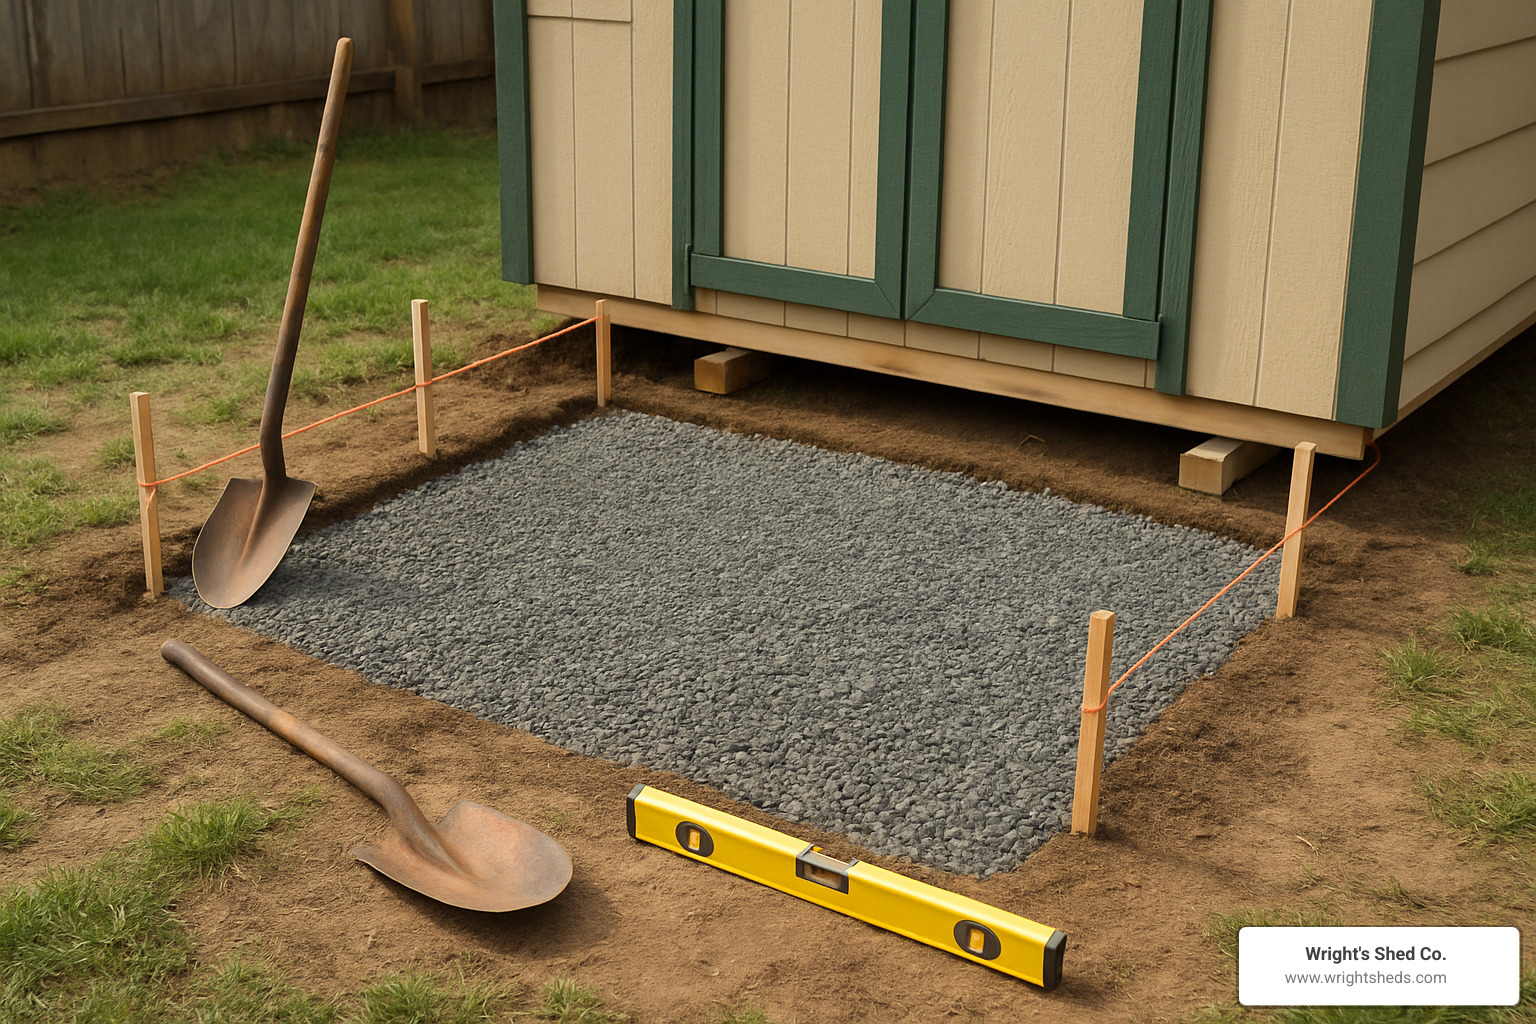
One tip I always share with Wright’s Shed Co. customers: “Pour a 2-inch concrete slab or use 12×12 pavers to raise your joists off the ground.” This simple step can double your ramp’s lifespan by preventing direct soil contact with the wood.
For properties with drainage issues, consider adding a slight cross-slope (about 1%) to direct water away from your shed foundation. Your future self will thank you after the first heavy rain!
2. Install Ledger & Joists
The connection between your ramp and shed needs to be rock-solid:
Begin by attaching a pressure-treated 2×6 or 2×8 ledger board horizontally across your shed threshold. Use 3/8-inch galvanized lag screws spaced about 16 inches apart for maximum strength. Position this ledger about 1/2 inch below your door threshold to ensure smooth transitions.
When cutting your joists, the angle matters! Use your rise/run calculations to determine the precise angle needed for your desired slope. Space these joists 12 inches on center—any wider and you risk a bouncy, unsafe ramp.
A trick I learned from a veteran Wright’s Shed Co. builder: “Overlap your ramp plywood by at least 4 inches over the shed floor joist.” This creates a significantly stronger connection than simply butting the ramp against the shed and prevents that annoying bump that forms at the threshold over time.
3. Decking & Traction
Your shed entry ramp surface needs to balance durability with slip resistance:
Install decking perpendicular to your joists using pressure-treated 2×6 boards or 3/4-inch exterior-grade plywood. Leave small gaps (about 1/8 inch) between wooden boards to allow for water drainage and natural wood expansion.
Traction is non-negotiable for safety! Consider applying anti-slip paint with embedded sand for maximum grip. For a budget-friendly alternative, stapled galvanized chicken wire works surprisingly well. Many of our customers in rainy areas swear by installing decking boards horizontally instead of vertically—the natural ridges between boards provide excellent grip even in wet conditions.
One customer told me: “After slipping on my vertical-board ramp last winter, I rebuilt it with horizontal boards. Haven’t had a single slip since, even when moving my heavy snowblower in and out!”
For concrete ramps, cut slanted grooves and a central drainage channel to improve traction and water runoff. This simple detail makes a world of difference during freezing weather.
4. Final Inspection & Load Test
Before declaring your shed entry ramp project complete, take time for a thorough safety check:
Verify that all fasteners are tight and properly countersunk to prevent tripping hazards. The entire structure should feel solid with minimal flexing when you walk or jump on it.
The real test comes when you try your actual equipment on the ramp. Move slowly, testing both going up and coming down. Pay special attention to low-hanging equipment like mower decks—they often require more clearance than you might expect at transition points.
At Wright’s Shed Co., we always have customers test their new ramps with their actual equipment before considering the job complete. Different mowers and garden tools have unique clearance needs that can only be verified through real-world testing.
A properly built shed entry ramp isn’t just about convenience—it’s about protecting your equipment investment and your personal safety. Taking the time to build it right means years of trouble-free use ahead!
Maintenance
Keeping your shed entry ramp in great shape isn’t complicated, but a little regular attention goes a long way. I’ve found that spending just a few minutes each month on maintenance prevents bigger headaches down the road.
Start by sweeping off leaves, dirt, and debris regularly—this simple habit prevents slippery conditions and extends your ramp’s life. Every spring, I recommend doing a thorough inspection where you check for loose screws, wobbly boards, or any signs of rot. It’s also smart to tighten any hardware that might have worked loose over the winter.
For wooden ramps, reapplying a water-resistant sealant every 2-3 years makes a huge difference in longevity. If you’ve used anti-slip coatings, check them annually as they tend to wear down with heavy use.
During winter months, be careful about what you use for ice removal. Regular rock salt can damage wooden surfaces—instead, opt for pet-friendly ice melt products that are gentler on your shed entry ramp while still keeping it safe to use.
Frequently Asked Questions about Shed Entry Lamp
What slope is safe for my shed entry ramp?
Finding the right slope balance is crucial for both safety and functionality. The ideal gradient really depends on what you’ll be using your ramp for.
If you need wheelchair accessibility, stick with the ADA-recommended 1:12 ratio (one inch of rise for every 12 inches of run). This gentle slope ensures safe, independent access for mobility devices.
For general purposes like moving hand trucks or garden carts, a 1:8 ratio works well and doesn’t eat up as much yard space. However, if you’re primarily concerned with getting lawn equipment in and out, don’t exceed a 3:12 ratio—any steeper and you risk safety issues with your mower.
“I always tell my customers that when it comes to slope, gentler is better,” says our accessibility specialist. “A slightly longer ramp takes up more space but pays dividends in safety and usability.”
Site-specific conditions might require adjustments. If your area gets icy winters, consider going with an even gentler slope than the minimums.
How do I attach a ramp securely to my shed?
The connection between your ramp and shed is the most critical part of the entire structure. A failure here can lead to accidents or damage to your equipment.
Start with a solid ledger board—a horizontal pressure-treated 2×6 or 2×8 secured directly to the shed’s frame. Use 3/8″ galvanized lag screws or bolts that penetrate at least 1.5″ into solid framing behind your shed’s siding.
Water protection is essential at this connection point. Install flashing above the ledger board to direct moisture away from this vulnerable area. Without proper flashing, water can seep in and rot both your ramp and shed floor over time.
For a smoother transition, extend your ramp decking to overlap with the shed floor by at least 4″. This creates both a stronger connection and eliminates the lip that equipment wheels might catch on.
Joist hangers provide crucial structural support where your ramp joists meet the ledger board. Don’t skip these inexpensive hardware pieces—they dramatically increase the strength of your connection.
Should I choose a permanent or removable ramp?
This decision comes down to your specific needs and situation. Both options have their place.
Permanent ramps make sense if you regularly use heavy equipment like riding mowers or if someone in your household has ongoing mobility needs. They’re typically sturdier, more integrated with your shed’s design, and require less fussing each time you need access. They also tend to add more value to your property.
On the flip side, removable ramps offer flexibility that permanent installations can’t match. Aluminum ramps in particular have become popular with Wright’s Shed Co. customers who want portability.
If you have limited space, only occasionally need equipment access, or might be moving your shed in the future, a removable option gives you the most flexibility. They’re also ideal for renters who can’t make permanent changes to their property.
Your budget matters too—while aluminum ramps cost more upfront ($300-450), they require virtually no maintenance and can be reused even if you replace your shed down the road. That long-term value often outweighs the initial investment for many of our customers.
Transform Your Storage Shed with a Custom Shed Entry Ramp from Wright’s Shed Co.
A properly built shed entry ramp transforms your storage shed from a sometimes-frustrating space into a fully functional extension of your property. I’ve seen countless customers struggle with awkward equipment storage before finding how a simple ramp can completely change their experience.
When that new zero-turn mower glides effortlessly into your shed for the first time, you’ll wonder why you waited so long to build a ramp. That’s the feedback we hear most often at Wright’s Shed Co. as we’ve been crafting custom sheds and ramps since 1997 throughout Utah, Idaho, Iowa, and Nebraska.
The beauty of a well-designed shed entry ramp isn’t just in its functionality, though that’s certainly important. It’s also about creating peace of mind. No more worrying about throwing your back out lifting that heavy snowblower. No more scratched shed floors from dragging equipment across the threshold. And certainly no more precarious balancing acts trying to get your wheelbarrow inside during a rainstorm!
One of my favorite customer stories involves an older gentleman who initially declined a ramp with his new shed purchase. Two weeks later, he called after struggling to get his riding mower inside. “This is the one thing I wish I hadn’t been so stubborn about,” he told me. We installed a custom shed entry ramp the following week, and he’s been recommending them to friends ever since.
Whether you’re tackling this as a weekend DIY project using our guide or having the Wright’s Shed Co. team handle the installation professionally, your future self will thank you. A quality ramp isn’t just an accessory – it’s an investment in convenience, safety, and the longevity of both your equipment and your shed.

