Why Outdoor Shed Construction Matters for Your Property
Outdoor shed construction is the process of building a durable, functional structure on your property to gain storage space, create a workshop, or add lasting value to your home. A well-built shed can solve clutter problems and provide a secure place for tools and equipment.
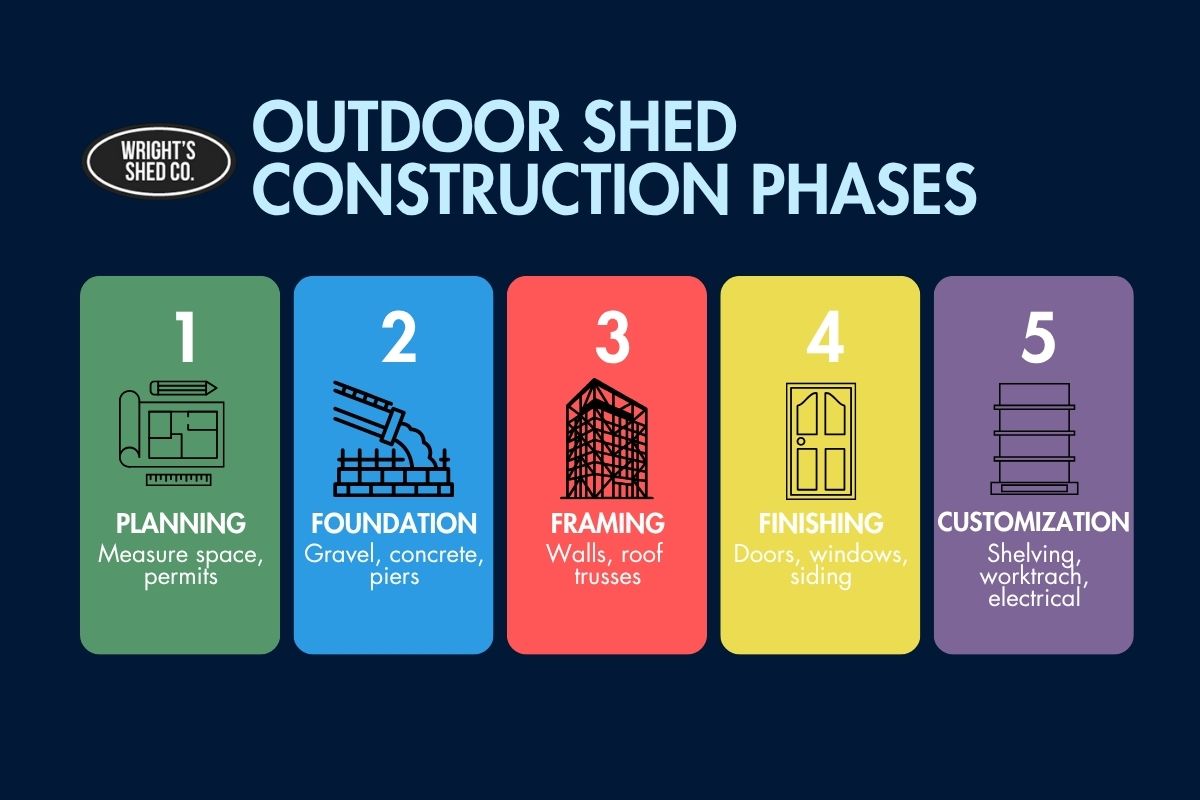
Successful outdoor shed construction involves six key phases:
- Planning: Defining the shed’s purpose, measuring your space, and checking local permits.
- Foundation: Choosing a stable base like a gravel pad, concrete slab, or piers.
- Framing: Building strong walls and roof trusses with quality lumber.
- Roofing: Installing weather-resistant materials to protect against the elements.
- Finishing: Adding doors, windows, and siding for function and curb appeal.
- Customization: Outfitting the interior with shelves, workbenches, or electrical features.
A properly built shed is an asset – a workshop, hobby space, or backyard office. A poorly built one, however, can lead to sagging doors, leaky roofs, and structural issues. Understanding the process, whether you’re going DIY or hiring a pro, helps you avoid costly mistakes.
Step 1: Planning Your Outdoor Shed Construction Project
Every great outdoor shed construction project begins with thoughtful planning. Before you pick out paint colors, ask yourself: What will I use this shed for? Is it for storing garden tools, a dedicated workshop, or a quiet hobby space? Your shed’s purpose dictates its size, layout, and features.
Consider future uses as well. You might only need to store a push mower today, but what about a riding mower in three years? Planning for growth ensures your shed remains useful for years to come. For help brainstorming, see our guide on Choosing the Perfect Design for Your Backyard.
Next, Locate the Perfect Site for Your Shed. Carefully measure your available space, leaving room for maintenance and opening doors.
Understanding Local Regulations and Permits
Navigating permits and regulations is a crucial step. Skipping it can lead to fines or even being forced to tear down your shed. If you’re new to the process, this overview of what a building permit is and how setbacks) work can be helpful background; many communities also reference the model International Residential Code when setting local rules.
Local zoning requirements and setback rules, how far your shed must be from property lines, vary significantly between towns. Some areas allow small sheds (e.g., under 100-200 sq. ft.) without a permit, while others have stricter rules.
If you’re in a neighborhood with a homeowners association (HOA), review their guidelines on shed size, appearance, and color. Since 1997, we’ve built thousands of sheds across Utah, Idaho, Iowa, and Nebraska, so we’re familiar with the local codes and can guide you through the process. For more details, check out What Size Shed Needs a Permit?.
Designing Your Shed’s Layout and Style
With the practicalities handled, you can design a shed that is both functional and beautiful. We offer several styles to complement your home, from the classic elegance of our Vineyard Shed to the timeless appeal of the Orchard Shed. For rustic charm, consider our Farm Shed, detailed in our Farm Shed: Ultimate Guide. For tight spaces, a Lean-To Shed is an efficient solution, and we have ideas for Lean-To Shed Layouts for Maximum Storage.
Explore all your options in our guide to Shed Styles: Exploring Unique, Versatile Options.
Your interior layout is just as important. Where should doors go for the easiest access? How many windows do you need for light and ventilation? Planning for workbenches or shelving now ensures your shed works for you every day. You can even create 3D design plans so you can see exactly what you’re getting before we start building.
Step 2: Foundations and High-Quality Materials for Outdoor Shed Construction
A house is only as strong as its foundation, and the same is true for outdoor shed construction. A solid foundation keeps your shed stable, dry, and level for decades.
While we don’t build the foundation ourselves, we provide expert advice on the best options for your site and shed design. Once your foundation is prepared, we arrive to build your shed on-site, nothing is pre-built. This allows us to ensure perfect quality from the first board to the last. Understanding Shed Foundation Types is the first step.
Choosing the Right Shed Foundation
The right foundation depends on your shed’s size, local climate, and terrain.
- Gravel pads are a popular, cost-effective choice for flat, well-drained ground, offering excellent drainage to prevent moisture problems.
- A concrete slab provides best durability for heavy-duty use, like workshops or storing large equipment. It costs more but offers a clean, stable floor.
- For uneven or sloped terrain, concrete piers create a level platform without extensive excavation.
- Pressure-treated wood skids are included as part of our standard floor frame, which is designed to rest on a prepared foundation like a gravel pad or concrete piers.
For more help, see our guide: What Type of Foundation is Best for a Shed?.
| Foundation Type | Cost | Durability | Terrain Suitability | Ideal Use Case |
|---|---|---|---|---|
| Gravel Pad | Low | Good | Flat, well-drained ground | Small to medium sheds, excellent drainage |
| Concrete Slab | Medium-High | Excellent | Flat ground | Larger sheds, workshops, heavy-duty use |
| Concrete Pier | Medium | Excellent | Uneven or sloped terrain | Ensures level support on challenging ground |
Selecting Durable Materials for Your Climate
The materials we use determine how well your shed withstands the elements. At Wright’s Shed Co., high-quality materials are standard, not an upgrade. This is one of the 5 Signs of a High-Quality Shed and why we can offer warranties.
For siding, we recommend LP SmartSide for its durability and wood-like appearance. For roofing, asphalt or composite shingles provide reliable waterproofing, while metal roofing excels in areas with heavy snow or intense sun, like we see in Utah and Idaho. We also take Shed Protection from Weather and Pests seriously, using pressure-treated lumber for floor framing and recommending concrete slabs in moist environments. These details ensure your shed lasts for decades.
Step 3: The Core of Outdoor Shed Construction: Framing and Roofing
This is where your shed truly takes shape. At Wright’s Shed Co., we pride ourselves on our on-site outdoor shed construction process. We build everything on your property, ensuring no pre-built or shipped structures. This approach allows for superior quality control and customization, ensuring the shed fits your space perfectly.
How to Frame Your Shed Walls
Wall framing begins with a pressure-treated bottom plate that forms the base of each wall on your foundation. From there, we install vertical studs to create the wall’s skeleton.
Quality makes a difference here: we use 16-inch on-center stud spacing as our standard. This provides far more strength and durability than the 24-inch spacing some builders use, which is critical for handling the heavy snow and strong winds we see across Utah, Idaho, Iowa, and Nebraska. Learn more in our article on Shed Wall Stud Spacing for Utah Weather.
A top plate ties the studs together and supports the roof. For door and window openings, we install strong horizontal beams called headers to carry the load from above. Once assembled, we raise each wall, ensure it’s perfectly plumb (vertically straight), and secure it to the foundation and adjacent walls. For a detailed walkthrough, see our DIY Shed Building Guide: Walls.
How to Frame and Install the Roof
The roof is your shed’s primary defense against the elements, making its framing critical in outdoor shed construction. We build sturdy, triangular roof trusses that distribute the roof’s weight evenly across the walls. Each truss consists of rafters, a bottom cord, and plywood gussets to connect the joints.
Precision is key; all trusses must have identical measurements to ensure an even roofline and structural integrity. We typically space trusses 16 inches on-center for maximum strength. We offer various Shed Roof Designs, from classic gables to lean-tos, each with a specific pitch. Understanding Roof Angles for Sheds helps you choose the right design for your climate.
After framing, we install roof sheathing (plywood or OSB), followed by roofing felt paper as a moisture barrier. Finally, we install your chosen roofing material, whether it’s architectural shingles or durable metal panels, ensuring it’s properly overlapped and fastened. For a detailed look, refer to our DIY Shed Building Guide: Roof.
Step 4: Finishing Touches for Functionality and Aesthetics in Outdoor Shed Construction
This is where your outdoor shed construction project comes to life. The finishing touches transform a basic structure into a functional and attractive asset you’ll be proud of. These details define your shed’s character and ensure it serves you well for years.
Installing Doors, Windows, and Ramps
The right doors and windows are essential for usability. We’ve seen sheds with doors too narrow for a riding mower, a frustrating mistake. We offer pre-hung doors for a great fit and custom-built doors for unique styles or oversized equipment. We carefully shim every door to ensure it swings smoothly without sagging.
Windows provide natural light and ventilation, making your shed a more pleasant space to work in. We’ll help you with placement to maximize light near a workbench or other key areas. For wheeled equipment, a ramp is a smart addition. Our guide explains Why You Should Consider Adding a Shed Ramp to save your back and protect your equipment.
Enhancing Your Shed’s Interior and Exterior
A quality coat of exterior-grade paint or stain is critical for weather protection and extends your shed’s life. We can help you choose colors that complement your home. Properly installed trim seals gaps and adds a professional, finished look. Our DIY Shed Building Guide: Trim covers this in detail.
Inside, the possibilities are endless. We can install workbenches, shelving systems, or a loft to transform your shed from simple storage into a highly functional workspace. Check out our Shed Organization Hacks for creative ideas. If you’re planning an Outdoor Office Shed, we can frame it to accommodate electrical wiring, which should always be installed by a licensed electrician for safety. Finally, simple landscaping can beautifully integrate your new shed into your yard.
Step 5: DIY Shed Kits vs. Professional On-Site Outdoor Shed Construction
When starting your outdoor shed construction, you face a key decision: a DIY kit or a professional on-site build? Both are valid options, depending on your skills, time, and priorities. Our guide on Custom or Pre-Built Shed: Which Should You Choose? explores this choice in depth.
The DIY Shed Kit Approach
Building something yourself can be incredibly satisfying. If you have carpentry experience, a DIY kit might be for you. These kits come with pre-cut pieces and instructions, simplifying the process.
- Pros: The main draws are the lower initial material cost and the sense of accomplishment. For skilled homeowners, our DIY Shed Kits provide the high-quality materials for a reliable structure.
- Cons: Building a shed takes significant time, often more than expected. Customization is limited, and you need the right tools and skills. Mistakes can lead to structural issues, and your labor isn’t warrantied, fixes are on you.
The Professional On-Site Build Approach
Hiring professionals for your outdoor shed construction offers distinct advantages. At Wright’s Shed Co., we’ve perfected our on-site building process since 1997.
Expertise and efficiency are the biggest benefits. Our crews can complete most custom sheds in just 1-3 days. We use high-quality materials as standard and back our work with warranties, giving you peace of mind you can’t get with a DIY project.
The greatest advantage is full customization. Because we build everything on-site, we can tailor every detail to your needs, from matching your home’s siding to specific door placements. While a professional build has a higher upfront cost, it often proves cost-effective when you factor in your time, tool costs, and the long-term durability of a warrantied structure.
As Professional Shed Builders in Utah, Idaho, Iowa, and Nebraska, we have local expertise. We know how to build for heavy snow, intense sun, and regional soil conditions, ensuring your shed is built right for where you live.
Frequently Asked Questions about Outdoor Shed Construction
How do I choose the right shed size for my needs?
Start by listing everything you plan to store, then add 20-30% more space for future needs and easy movement inside. It’s always better to have a little extra room than not enough. Our team can help you visualize different sizes on your property to find the perfect fit.
What is the best material for a long-lasting shed?
We recommend LP SmartSide siding for its superior resistance to weather and impact, and our standard architectural shingles provide reliable waterproofing. For even greater durability in areas with heavy snow or intense sun, a metal roof is an excellent long-term investment. We use premium materials on all our builds to ensure they last.
How long does it take to build a custom shed on-site?
Thanks to our efficient on-site construction process, most of our custom sheds are fully built in just 1-3 days. Our experienced crew handles everything from start to finish, minimizing disruption and leaving you with a ready-to-use structure.
Can I customize the interior of my shed?
Absolutely! We can incorporate custom shelving, sturdy workbenches, and overhead storage lofts to create a highly functional interior. We’ll help you design a layout that perfectly matches how you plan to use your shed, whether for storage, a workshop, or a hobby space.
Do you build detached garages and chicken coops as well?
Yes, we apply the same on-site building expertise and high-quality materials to construct custom detached garages and chicken coops. Whether you need vehicle storage or a safe home for your flock, we build durable structures custom to your specific needs.
Your Local Experts for Outdoor Shed Construction
Outdoor shed construction is a significant investment in your property’s value and functionality. From planning and material selection to precise on-site framing and finishing, the team at Wright’s Shed Co. ensures your shed, detached garage, or chicken coop is built to last for decades.
Since 1997, we’ve served as local experts across Utah, Idaho, Iowa, and Nebraska. We understand the regional climates, from Idaho’s snow loads to Utah’s intense sun, and build accordingly. Every structure we create uses high-quality materials as standard and is backed by industry-leading warranties of up to 50 years on our craftsmanship.
We build everything on-site, right on your property. This means no pre-built boxes; instead, you get a truly custom structure adapted to your space and vision.
If you’re ready to transform your property with a perfect shed, we’re here to help. Whether you need a classic Vineyard Shed, a spacious Farm Shed, or a custom detached garage, our team brings the same dedication to every project. If you’re in Idaho, Utah, Iowa, or Nebraska, contact our Idaho team today to start planning your perfect custom shed! Let’s build something great together.


